Planning A Styled Shoot From Start to Finish | Step One: Prepare
This last year one of my business goals was to plan and execute a styled shoot! If you’re in the wedding industry, this is such a wonderful way to get to know and create with other vendors! It’s practical marketing because everyone shares images to their whole following and tags each business involved! And if both of those first reasons aren’t enough incentive to try one for yourself, imagine getting to shoot a “wedding” with every detail exactly as you ever dreamed! Because there’s a lot that goes on behind the scenes before ever getting to the actual styled shoot, I’ve broken down this series into a step by step guide! Ready to get going?
Let’s do this!
(Insert all the emojis!)
STEP ONE: PREPARE
A) USE PINTEREST
This is possibly one of the most important steps! In order to cast a great vision to other vendors you hope to collaborate with, you yourself have to have a refined vision! I started by going to Pinterest and creating a secret board. Then type in key words that you hope to describe your styled shoot after it’s all said and done. Words like, “desert” and “Maroon” and “Lace” and “Elopement” were some that came to my mind first when I was planning mine! I pinned everything that caught my eye! Don’t hesitate to go crazy! You’ll narrow your vision soon! As you’re pinning be asking yourself questions like:
-Do I have images that would include all the vendors?
-Am I thinking about the shoot as a whole (seeing the big picture)?
-How about the tiny details?
Once you have you’re folder full of images….it’s time to hone in. Look for repeating themes, repeating colors, repeating settings. Those are clues! Anything that you see a continuous trend in–it means you’re leaning in a certain direction and your vision is becoming more clear!
B) CREATE AN INSPIRATION BOARD
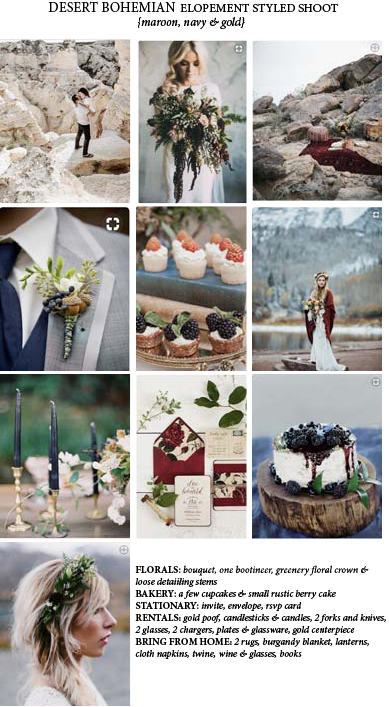
Now that you have a specific vision, narrow your images to your top 8-9 pictures. As you’re narrowing, pick shots that highlight each vendor so they are able to see the direction you are hoping to head! Got those images? Pull them into a program (I used Illustrator) and create your inspiration board! At the top, use descriptive words that will catch the vendors eye and right away let them know what you’re hoping to create! Then pull the images into your file! At the bottom right I included a list of what I hoped each vendor might supply! Here is my inspiration board as a sample! (All images were taken off Pinterest except for the top left image which is my incredible friend Abby Noelle Photography’s shot from the actual location I was hoping to shoot at!)
C) MAKE LISTS
Now that you know where you’re going, start making your lists!
-List what all you’ll need (think candlesticks, candles, rug, cake, invites, books, dress, models, florals etc etc)
-List what locations might fit the vibe
-List specific vendors you hope to reach out to (we’ll talk more about this later!)
-List potential dates you’re looking at/timeframe
Fewf! Okay, lots of work! You’re making awesome progress! Come back next week to find out the next steps in the process to planning your dream styled shoot!
P.S Here’s a list of the talented vendors I worked! Their work will be featured throughout the series!
Baker: Blue Thistle Cakes
Rentals: Ultra Pom
Florist: Heart & Soul Floral
Designer: Beth Laird